If you’ve decided that cloud storage is right for your business – and you’ve found a solution that meets all your needs – it’s time to make the move from local storage to the cloud. The process can seem daunting, however, especially when you fear losing your vital website data if you make a mistake.
Fortunately, transferring your backup files isn’t as overwhelming as it first appears, and you won’t need an expert’s assistance. In addition, there are a number of steps you can take to reduce any risks involved in the process.
In this third (and last) post in our series on cloud storage, we’ll let you know exactly what you need before you begin the process of transferring your files, and explain how to overcome three common challenges you may face during file transfer. Then we’ll discuss the three main ways you can transfer your backup files to cloud storage. Let’s get started!
What You’ll Need Before Transferring Your Backups
Before you begin, there are a few steps you’ll want to take. First, we recommend that you read the first two posts in our cloud storage series to get caught up: An Introduction to Cloud Storage and 5 Crucial Features to Look for in a Cloud Storage Solution. You’ll also need to have locally-stored backup files. These can be kept on a computer, flash drive, or other on-site server.
Last, before the transfer can take place, you’ll need to have chosen a suitable cloud service provider. There are many to pick from, all with their own benefits and best uses, so it’s important to take some time and sort through your options before moving forward.
3 Challenges You May Face During File Transfer (And How to Handle Them)
One more thing to consider before you begin the transfer process is how you’ll handle any challenges that come up. While the majority of transfers are smooth, it’s best to be prepared to mitigate damages. Let’s look at three common challenges and how to handle them properly.
1. Brief Security Risks
It’s essential to ensure that your files are protected during file transfers. This is because a brief window appears in the midst of the process where security risks are more prevalent.
During transfer, your files are essentially in limbo, as they’re not secured or otherwise protected from hacking. In addition, interruptions or other mistakes may result in data loss during the process. This can put your website at risk, as you may no longer have the most up-to-date backup file on hand.
Fortunately, there are several ways you can mitigate security risks and keep your backup files secure and protected. Here are the two steps we most highly recommend:
- Save your files (backup and otherwise) in multiple secure locations: As a rule of thumb, we (and many technology experts, including Jack Schofield) recommend that you save your files in at least two different locations – although three is even better.
- Password-protect your backup .zip files with open source software, such as 7-Zip: Password protection can be removed once transfer is complete (if you wish), but it will help to secure your files in the interim.
Overall, be sure you’re using a secure network (i.e. not a public one), and only upload to servers that you can trust, such as established cloud solutions. This will further minimize the risks involved in the process.
2. Network Connection Interruptions
While hacking attempts can take place during a file transfer, it’s much more likely that any interruptions are related to your network connection. In short, the strength of your connection can play a key role in enabling a smooth transfer of your backup files.
You may not have difficulty with your network connection from day to day, but transferring a large amount of data can strain it. This can lead to extremely slow transfer times (putting your backup files at greater risk), as well as interruptions that completely stall the transfer.
When it comes to mitigating this risk, you have two main options:
- Use an ethernet connection. While this may not necessarily speed up the process (depending on your internet connection), it can keep your network connection consistent, which will prevent interruptions.
- Perform the transfer in chunks. The backup files produced by WPBackItUp are in .zip format, and you can choose between saving the whole file in one folder, or saving them in smaller chunks by downloading each archive file one by one. If you have a poor network connection, we recommend choosing the latter. While uploading such files will take a bit longer, the reduction in risk is worth it.
Unfortunately, you can’t plan for everything. However, you can minimize the risk of network connection interruptions to make the process smoother.
3. Improper File Organization
After you move your files from one place (local storage) to another (cloud storage), you may find that your once well-organized files are now in disarray.
While this isn’t a huge issue – after all, you can use the cloud storage’s search function to locate necessary files – it can be a hassle. When something happens that requires your backup files, you want to be able to locate the right ones immediately.
Fortunately, many cloud storage solutions (including Google Drive, Microsoft OneDrive, and Dropbox) let you organize your files both during and after the transfer. Here are a few tips to get you started:
- Name your files and folders appropriately. Even with an organizational system in place, you want to be able to tell what each folder contains in a glance. This means giving your files and folders descriptive names, and even using dates to further distinguish them.
- Delete old files and folders. To make it easier to find the files you need, be sure to clear out the clutter on a regular basis. We recommend keeping at least three old backups on hand (in addition to your most recent one). However, that still gives you a lot of leeway when cleaning out your storage.
How you choose to organize your backup files within your cloud storage solution will come down to preference. What matters is that you have a system in place that works for you.
How to Transfer Your Backups From Local to Cloud Storage (In 3 Ways)
Once you’re ready to take the plunge, you have three main transfer options. The first two involve moving your already-saved backups from local storage to a cloud storage solution, and relocating them manually via FTP. If you use WPBackItUp, you can also transfer your backup files directly from your dashboard.
1. Transfer Your Backups From Local Storage
When your backup files are already saved in a local storage location, transferring them to cloud storage is simple.
First, visit the cloud storage solution of your choosing (we’re partial to Google Drive). Many enable you to drag and drop files, or use an upload feature. For Google Drive, the second option can be found under New > File upload:
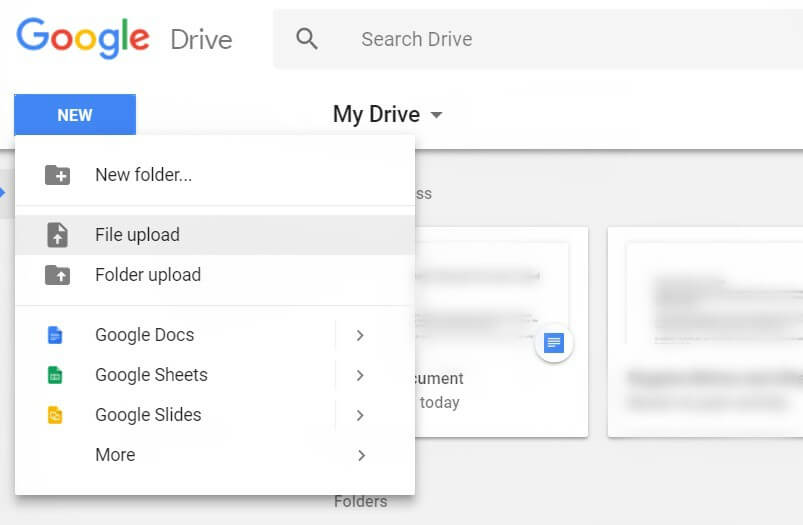
Transfer the .zip file (or a backup file folder) to cloud storage using either method, and you’re all done!
2. Transfer Your Backups Using FTP
While there are easier methods for downloading and transferring backups (as we’ll discuss in the next section), if you need to move a backup manually, you can do so using File Transfer Protocol (FTP). You can then download it to your computer, and transfer this newly-created backup to your cloud storage solution using the instructions outlined above.
The first step in this process will require you to choose an FTP client to access your site’s files. We recommend FileZilla, and will assume you’re using it for the purposes of this guide. However, there are many other quality programs to choose from, and your website host may even offer their own dedicated tool.
Next, you’ll need a few key pieces of information, including your host, username and password, and port number (typically 21). Depending on your host, you may already have some of these details. However, other hosts may require that you set everything up yourself.
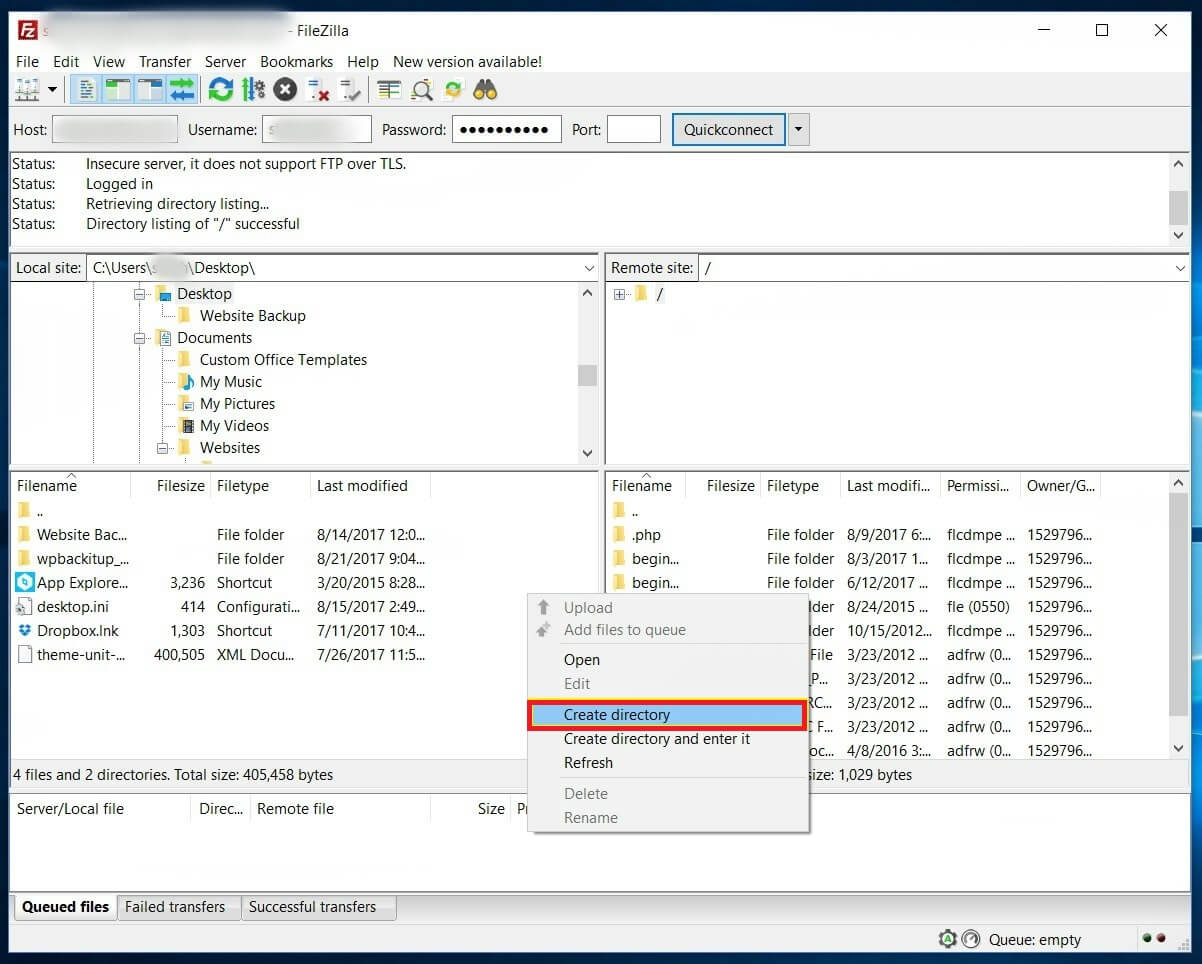
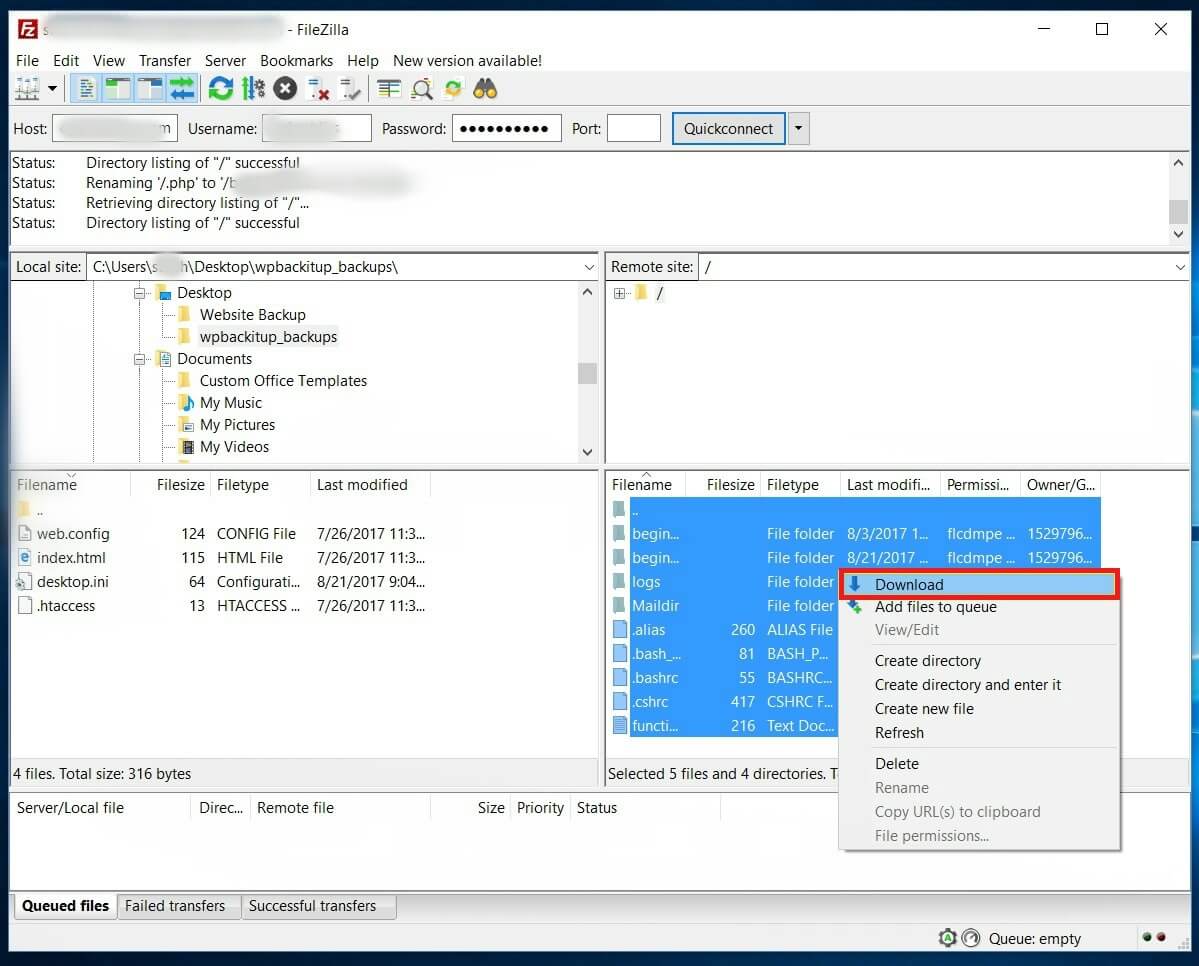
Once you’ve successfully logged into your FTP client, it’s time to download the backup files. Start by clicking on Desktop in the top-left quadrant of FileZilla, then right-clicking within the lower-left quadrant. There, you’ll want to select Create directory from the menu that appears:
To save your files to your new directory folder, double-click on that folder. You can now select all the backup files you’d like to transfer within the lower-right quadrant. WPBackItUp backups can be found in the wp-content\wpbackitup_backups folder. You can select as few or as many items as you’d like:
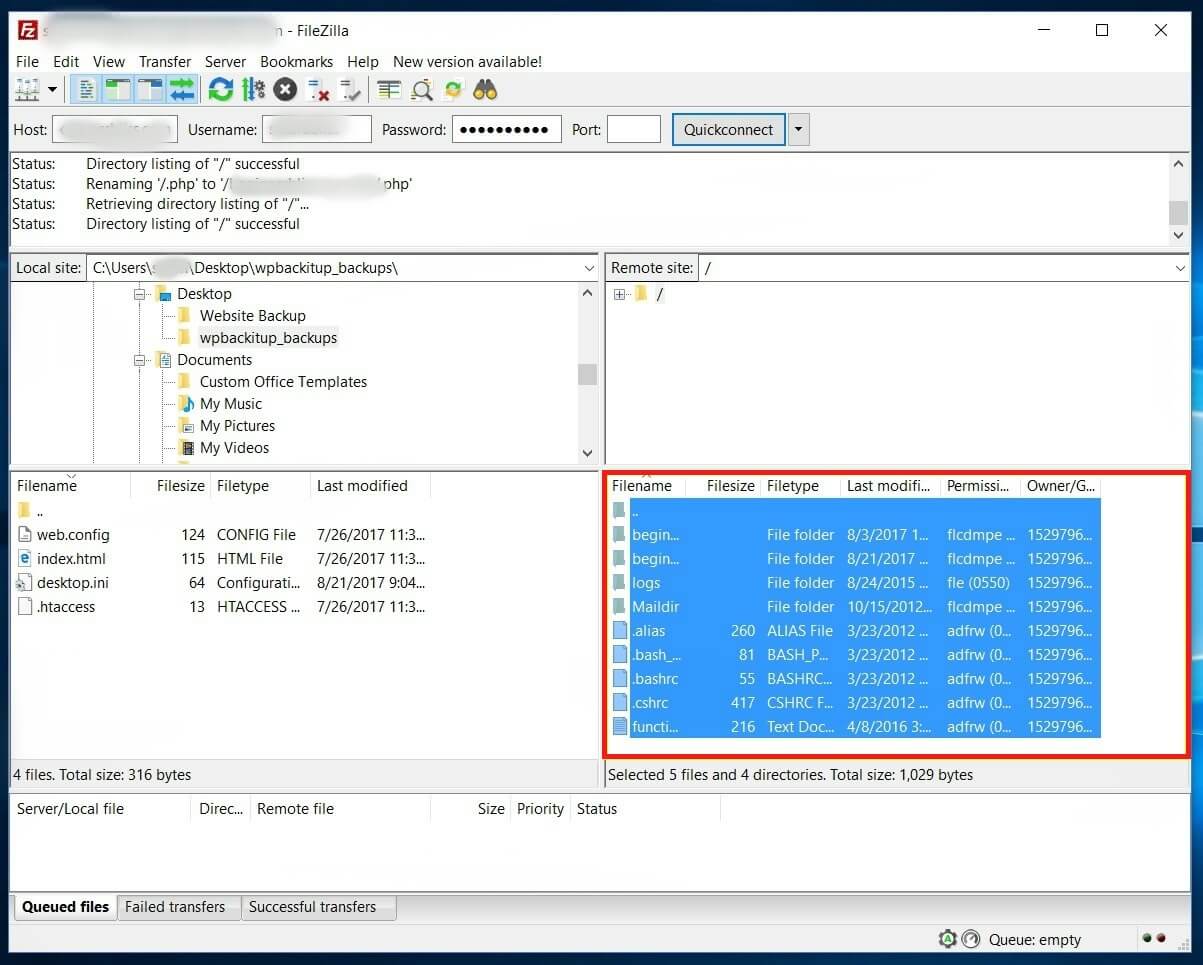
Remember to at least download the backup file containing -main- in the name, as this contains your WordPress database. Otherwise, your transferred backup will be incomplete and essentially useless for restoring your site should the worst occur.
The last step is the simplest part. Once you’ve highlighted all the folders and files you’d like to transfer, right click on any of the selected files. Select Download from the menu, and all files will be downloaded to the local directory you created above.
Once your download is complete, you’ll find the backup files on your Desktop and can copy them over to the storage solution of your choice.
3. Transfer Your Backups From the WPBackItUp Dashboard
WPBackItUp is an all-in-one solution that enables you to back up your website’s files, download and save those files to external storage, and even restore your website with the click of a button.
One of WPBackItUp’s most important benefits is how easy it is to save your backup files. All you need to do is download the files to your computer, and upload them to the cloud storage solution of your choice.
To download your files, go to WPBackItUp > Backup. Click Backup to create a file, or select one from the Available Backups section. From here, you can then choose to download a single zip file of your backup, or download the backup in smaller pieces to make transfer easier:
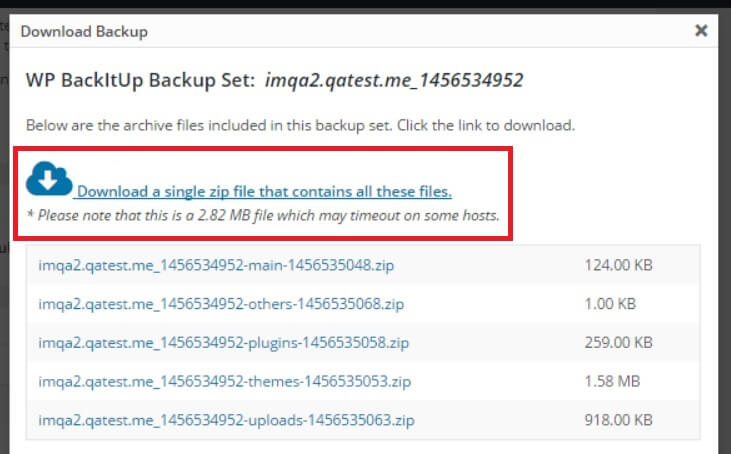
Save the download(s) to your computer. To upload them to cloud storage, simply drag and drop the files or upload them to your preferred solution. That’s it – your backup files have now been safely transferred to the cloud!
Conclusion
Cloud storage offers many benefits, including increased security and improved functionality. As you make the move to cloud storage, you may feel overwhelmed by the task at hand. Fortunately, the process can be performed easily (whether from your local server or the WPBackItUp dashboard) and with little fuss.
In this post, we’ve prepared you for a successful transfer, and highlighted three common challenges you may face and how to handle them. Additionally, we’ve discussed three ways to go about transferring your files to a cloud storage solution. To quickly recap, you can transfer your backups:
- From local storage.
- Manually, using FTP.
- Via the WPBackItUp dashboard.
Do you have any questions about the transfer process, or how you can use WPBackItUp alongside a cloud storage solution? Let us know in the comments section below!
Image credit: Pixabay.