
There are a number of reasons you might choose to clone your website. Maybe you’d like to create a ‘staging site’ to test new plugins and design changes, or perhaps you plan to move your website from one web hosting provider to another. There’s just one problem: the process can seem intimidating at best, and downright impenetrable at worst.
With a plugin such as WPBackItUp, however, you can clone your site in minutes without having to touch a single byte of code – whether you’re an experienced developer or a blogging newbie.
In this post, we’ll first cover what cloning is and why you’d want to clone your website. Then, we’ll walk you through the three simple steps required to perform WordPress site cloning with WPBackItUp. Let’s get started!
Why You’d Want to Clone Your WordPress Site
In simple terms, cloning is the process of copying your website in its entirety, then setting up an identical yet separate version of it (i.e. a ‘clone’). The two sites could be on the same or different servers, depending on your needs.
While this may seem an odd undertaking, there are a number of reasons you may want to clone your site, with the following three being the most common:
- Development. Web designers will typically work on a local or remote version of a site during its development. Once a site is ready to go live, they will clone and transfer it to the ‘live’ web server.
- Testing (or ‘Staging’). When it comes to installing a new theme, integrating a new plugin’s functionality, or implementing any meaningful update on your site, a ‘staging’ site will enable you to test your changes without affecting your live site.
- Migration. Should you want to move your site from one hosting provider to another, creating a clone of your site will be necessary.
If you’d like to clone your site for any of the above reasons, you’re in luck! With the three simple steps outlined below, you can get started with WordPress site cloning in a matter of minutes.
How to Clone Your WordPress Website (in 3 Simple Steps)
While there are multiple options available when it comes to site cloning, we naturally recommend our very own plugin – WPBackItUp.
More than just a solution for backing up your site, WPBackItUp also makes it easy to perform cloning, thanks to its one-click backup and one-click restore features, as well as its user-friendly interface and versatility.
While a free version of WPBackItUp is available, cloning is a premium feature. To get started, you’ll first need to purchase a license and install and activate the plugin on your WordPress site. Once that’s all taken care of, you’re ready to begin.
Step #1: Back Up Your Site With WPBackItUp
While backing up your site prior to cloning is a necessary step, backups are important for a variety of other reasons. Having one in place is essential if you’ll be making any changes to your website, and backups should be carried out on a regular basis to ensure that no vital information is lost.
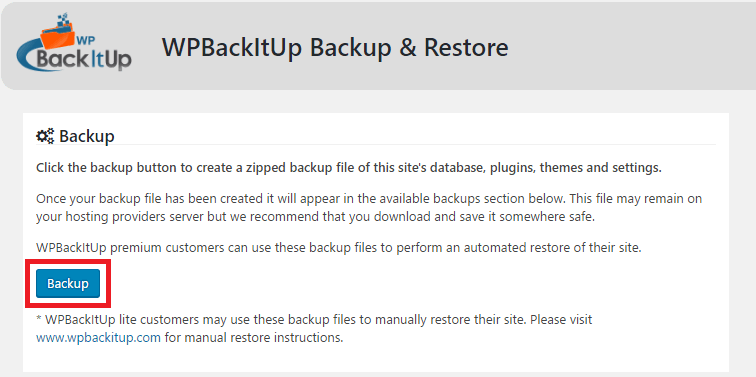
Once you have installed and activated WPBackItUp, hover over WPBackItUp in the sidebar and select Backup:

Next, click the Backup button, and the process will begin:
We’re not done quite yet. Now that the backup has been created, we have to save it to a safe place. To download a backup, go to the Available Backups section on the Backup page:

Click on the name of the backup you would like to download, and then select the download button (boxed in red below). This is a .zip file, and it contains all the individual backup files in one place.
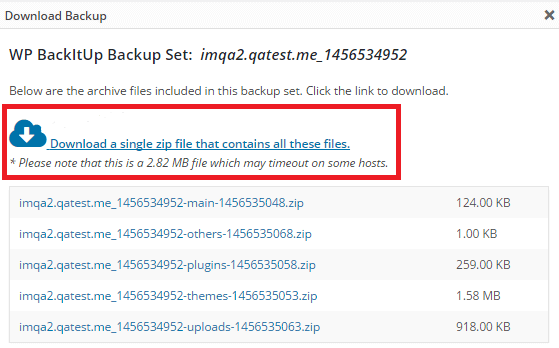
The file will automatically be saved to your computer. That’s it!
Step #2: Set Up a New WordPress Site
Now that you’ve created and downloaded your backup, it’s time to set up a new WordPress site where you can upload the clone.
You can do this in a number of ways, though the two easiest options are:
- Create a subdomain. Most hosting providers enable you to set up subdomains (e.g. http://subdomain.yoursite.com/) that you can host a cloned site on. See your provider’s documentation for further information. Once you’ve created a subdomain, install WordPress via your host’s provided means.
- Create a local site. A local site lives on your computer, within a ‘virtual’ server environment. Setting one up is less complicated than it sounds, and provides you with a super-fast environment for development and testing purposes.
The point of a cloned site is to have two sites that display the exact same content. To ensure this, there’s one very important thing to keep in mind: WordPress database table prefixes. Essentially, table prefixes determine what content is shown on your site. For both the original and the cloned site to display identically, the table prefix on the cloned site may need to be edited.
While this can seem overwhelming, rest assured that the process for editing the cloned site’s table prefix is pretty straightforward. To make the process easier, however, we recommend that you use an FTP client. FileZilla is a popular option (though there are many others to choose from).
Once your new site is up and running and you’ve ensured that the original and cloned site’s table prefixes are identical, you can now install the WPBackItUp plugin on your cloned site.
Step #3: Restore Your Backup to the Clone Site
For this final step, you’ll need to activate the WPBackItUp plugin license you received upon purchase. To find the license, navigate to Account on the WPBackItUp home page, then click View Licenses located under the Licenses / Downloads / Activations section:

Copy the license key located on the View Licenses page. Now, return to your cloned WordPress site, and navigate to WPBackItUp > Backup. On the right side of the screen, you’ll notice a section entitled Register WPBackItUp. Paste the license and click Register.
Now that your plugin license is all set up, let’s restore your site backup!
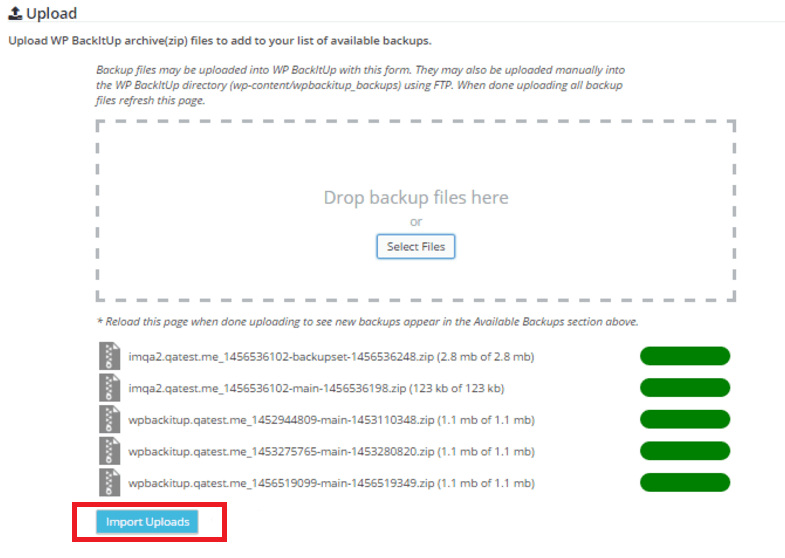
On your new site, navigate to WPBackItUp > Restore. Find the Upload section, and then either drag-and-drop your site’s backup .zip file, or manually search your saved files by clicking Select Files.
Once the files have finished uploading, select Import Uploads:
Finally, on the Restore page, locate your now imported upload. This will be seen in the Available Backups section:
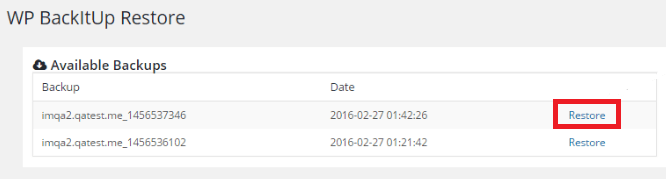
Click Restore on the backup you’d like to restore, and WPBackItUp will do the rest. With that, you have successfully cloned your WordPress site!
Conclusion
Site cloning can be utilized by WordPress users for a variety of reasons, including development, testing, or migration. If you don’t consider yourself to be the most technically adept person, you may find the process overwhelming. With WPBackItUp, however, the process takes no time at all.
In the above post, we showed you how to clone your WordPress site in three easy steps. Here they are again:
- Create a site backup with WPBackItUp.
- Set up a new WordPress website.
- Upload and restore your backup to the clone site.
Are you having any problems cloning your site with WPBackItUp? Let us know in the comments section below – we’d be happy to help!
Image credit: Nick Youngson.